


Summary
- Build your own HTPC with a Mini PC and Linux for total content control of your media library and a commercial-free viewing experience.
- A Raspberry Pi is enough to get started on a budget, but for ultra-high definition content or additional gaming, choose a Mini PC with extra power.
- Linux is the perfect media center OS, letting you use media servers like Plex or Jellyfin, or standalone options like Kodi.
Streaming platforms keep raising their prices, and cable TV is infested with ads (and sanity-draining 24-hour news channels). A DIY HTPC (Home Theater PC) using a mini PC and Linux is the perfect escape, putting you back in control of the content you watch.
What Is an HTPC?
An HTPC is a PC that you connect to your living room TV. Rather than being used for office tasks or gaming, its purpose is to play your movie, TV show, and music collection. You can set up streaming services and access live TV and YouTube, and for the best ad-free experience, copy your own collection of movies and shows to your device to watch whenever you want. It’s also a great alternative to connecting your smart TV to the internet, a well-known privacy disaster.
Building a HTPC requires three things: a PC, an operating system (preferably Linux), and enough storage to hold all your media files.
Hardware You Need for an HTPC

Linux Penguin Sitting Next To Mini PCs
Mini PCs are perfect HTPCs: They’re quiet, consume less power than their full-sized desktop brothers, and they can be easily tucked behind a TV out of view.
While there are a lot of cheap mini PCs available on online marketplaces, if you’re planning on watching 4K video you should pick one with a bit of extra power. At least 8GB of memory and an i5 CPU or equivalent are recommended for ultra-high definition media. You’ll also want to make sure it has an HDMI port, built-in Wi-Fi, and plenty of USB ports for expansion. An Ethernet port is a bonus if your house is wired for it.

MINISFORUM UM890 Pro
$648 $810 Save
$162
Mini PCs don’t have to be slow, which the MINISFORUM UM890 Pro proves without a doubt. This compact computing box comes with a beastly CPU, an integrated GPU fast enough even for low-detail AAA gaming, and plenty of upgradable memory and storage.
If you want to (legally) load your existing Blu-ray and DVD collection onto your media center, you’ll also want to pick up a USB Blu-ray drive. Once you’re done copying your movie collection to your HTPC, you can unplug it so it doesn’t clutter up your living room.
The last piece of the puzzle (aside from storage, discussed later) is a remote. There are a bevy of mini keyboards that are perfect for this on your favorite online auction site. Just search for “mini wireless keyboard” and pick one that suits your budget. You can also use a game controller if you don’t need a full keyboard.
HTPC Software and Operating Systems

Once you’ve got your HTPC hardware sorted, it’s time to choose the software to power it. While you can use any distribution like Ubuntu or Fedora to play media files or host media center software like Plex or a Plex alternative, there are Linux distributions that come pre-configured for HTPCs, including LibreELEC and OSMC. Whether you install and configure HTPC software on an existing machine or use a HTPC-specific distribution, you should make sure your chosen solution has a user interface designed for navigating your media library on a big screen, and supports remote controls and game controllers so you don’t have your valuable couch space taken up by a keyboard.
When choosing your HTPC software, you’ll need to decide between a networked solution, or one that can run standalone. Some HTPC software is split into “servers” and “clients”. Home media servers do all the work: storing, cataloging, and serving up your media files, streaming them to the clients that provide the user interface and watching experience on different devices. In more complicated home-server set-ups, you might want to run a separate server and have multiple clients (one for each of your TVs, and maybe even on your phones and tablets if you want to watch something in the tub). Plex and Emby have historically been the go-to choices for client/server HTPC software, while Jellyfin is becoming increasingly popular due to its focus on privacy.
“Standalone” media centers, on the other hand, run on a single device rather than being split into a client/server. This makes them simpler to set up and maintain, as they access their media either from a USB device or from a network share rather than a streaming media server. Kodi is the most popular of these.
HTPC Storage: NAS or External USB Hard Drive?

The final piece of the HTPC puzzle is storage. If you’ve already got a big network attached storage (NAS) or are sharing your media from your PC, you’ve already got this covered. If you don’t yet have a NAS, and want to store more than just media (and maybe get into hosting other apps using Docker), a NAS is a versatile investment. You can even host a Jellyfin server directly on many NAS boxes.
If you’re looking for the simplest option, an external USB hard drive is a convenient and reliable (if a little low-tech) way to transfer and play files on your HTPC. Just copy your media to your external drive from your PC, and plug it into your HTPC to play it.
Or, Just Build One With Parts Around Your House

It’s Friday, you want a weekend project, and you’ve got overnight shipping. Here’s a recipe for a simple and cost-effective HTPC using a Raspberry Pi (acting as our mini PC), a USB hard drive, and LibreELEC (a version of Kodi that’s really easy to set up). Here’s what you’ll need:
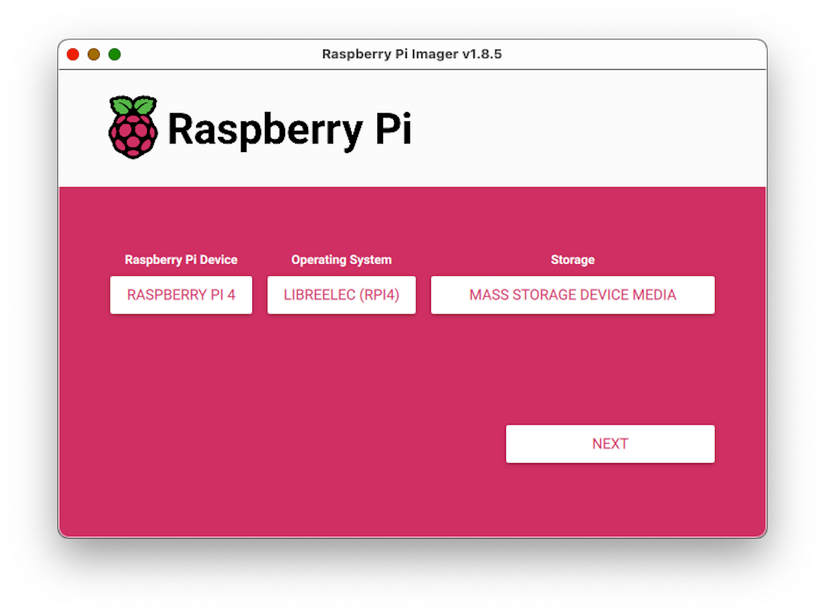
You’ll also need an HDMI cable if you don’t have a spare one in a drawer. Once everything is connected, you can install LibreELEC by downloading and running the Raspberry Pi Imager from the Raspberry Pi website, and selecting Media player OS > LibreELEC when choosing which operating system to install. Make sure you choose the right version for your Raspberry Pi, and be careful that you select the intended storage device as the Raspberry Pi Imager will completely erase it of all data.
Put your SD card back in your Raspberry Pi and start it up. You’ll then be prompted with the LibreELEC/Kodi setup process. It’s straightforward, just follow the steps as they are explained and make sure your device is properly connected to your Wi-Fi network before continuing. You’ll be prompted to enable SSH (remote access) and SAMBA (file sharing), but these aren’t required for accessing media on a USB drive, and can be enabled later if you need them.

The last step is to add some media to your home theater PC. This is as easy as copying your media files from your computer to your external USB hard drive (make sure it’s formatted with exFAT before you start), and then connecting the drive to your Raspberry Pi.

Then, in Kodi, navigate using either the mouse or keyboard to your storage device, and play your media files or add them to your library. Kodi supports a huge array of media formats, and its interface looks great on TVs. It’s also easy to navigate with arrow keys rather than trying to maneuver a mouse pointer across your big screen. Once you’re familiar with things, you can configure individual media libraries and check out the available games and add-ons, as described in the Kodi documentation.
HTPCs are a great project, but they do spend a fair bit of time sitting idle. If you outgrow Kodi and have a compatible device, TrueNAS can act as an entire home server and stream your media to any device with a web browser.
If you’re sticking with the Raspberry Pi, you an expand its functionality with game streaming to your TV from your gaming PC using Sunshine, set up an AirPlay server for listening to music, or even set up TailScale for remote access.

